
Share this @internewscast.com
Have you ever tried to show someone what’s on your laptop screen and found yourself at a loss? You’re not alone; it’s both inconvenient and awkward, especially during a project, tutorial, or troubleshooting session. This is where knowing how to screen record on a laptop becomes a lifesaver.
Luckily, there are numerous efficient solutions for both Windows and Mac that make screen recording a breeze. In this guide, we offer a comprehensive, step-by-step tutorial on screen recording for laptops, covering Windows 10 and 11, as well as your Mac. For a detailed insight on Mac, our previous article about how to screen record on Mac offers an in-depth explanation.
Read on to find out exactly how to screen record on Laptop in Windows 10 and 11 and Mac.
How to screen record on Laptop with Xbox Game Bar
The Xbox Game Bar comes built into Windows and is primarily designed to capture gameplay or stream directly from an Xbox console. Beyond gaming, it doubles as a tool for recording non-gaming applications and tasks effortlessly.
Xbox works for both Windows 10 and 11 so here is how to enable the Xbox Game Bar for both Windows 10 and 11:
To enable Game Bar in Windows 10, navigate to Settings > Gaming > Xbox Game Bar and toggle the switch next to Enable Xbox Game Bar. From here, you can use the Open Xbox Game Bar button on a controller box to activate the Game Bar via the Xbox button on an Xbox Controller. This panel also allows you to check the default shortcuts for various Game Bar activities and configure them with your key combinations.
To enable Game Bar in Windows 11, navigate to Settings > Gaming > Xbox Game Bar and select Open Xbox Game Bar using this button as a controller to utilize an Xbox gamepad to activate the Game Bar. The Xbox Game Bar app’s settings menu allows you to view and configure the feature’s keyboard shortcuts.
Let’s quickly go over how to screen-record
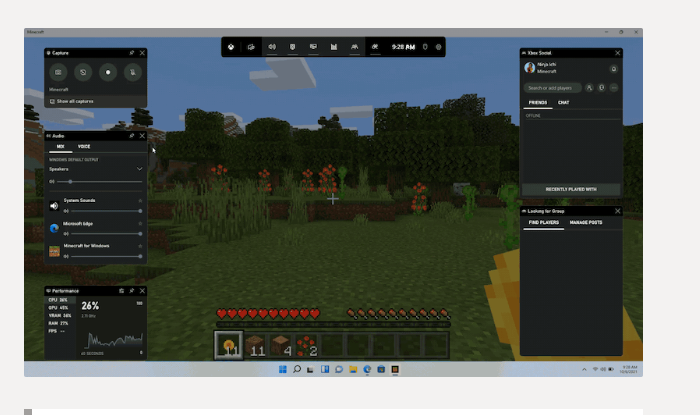
To open the Game Bar, press Windows + G. Several Game Bar widgets appear on the screen, containing controls for taking screenshots, recording video and audio, and broadcasting screen activity. To capture screen activity, click the Start Recording button or use the keyboard shortcut Win+Alt+R. You will be able to record activity in most apps and windows, with the exception of the Windows desktop, File Explorer, and specific Windows apps like Weather.
You can now do whatever screen actions you choose to capture. When you click the screen, the Game Bar widgets vanish, and a little floating bar in the upper-right corner of the screen appears, allowing you to control the recording. To stop recording, click the Recording button on the floating bar.
A message appears at the end of the recording, indicating that the game clip was captured. Click the notice to see your video in the Game Bar. To see the video, simply click the Play button. You can also access your video from the default place in File Explorer: C:\Users\[username]\Videos\Captures. Your videos will be saved here as MP4 files, which you may subsequently post or transfer elsewhere.
To customize the Game Bar in Windows 10, navigate to Settings > Gaming > Captures. From here, you may alter the default file location for your movies, enable background recording to capture activities after the fact, record video alongside audio, and adjust the frame rate between 30 and 60 frames per second.
Check out more guide below
How to Screen Record Windows 10
Following these steps will teach you how to use Windows 10’s built-in features to record your screen. These instructions will show you how to quickly set up, start, and store your screen recordings.
Step 1: Open the Xbox Game Bar.
To open the Xbox Game Bar, use the Windows key + G.
The Xbox Game Bar is a feature embedded into Windows 10 that allows you to capture your screen, among other things. To bring up the overlay, make sure to hit the keys simultaneously.
Step 2: Access the Capture Widget.
Click on the “Capture” widget in the Game Bar overlay.
The Capture widget is your go-to tool for screen recording. If you don’t see it right away, check for the webcam icon or navigate the menu.
Step 3: Start recording.
Press the “Start Recording” button (a circle icon), or press Windows + Alt + R.
Once you press the record button, everything on your screen will be captured. A little recording bar will display, indicating the length of your recording.
Step 4: Stop recording.
Press the “Stop Recording” button, or press Windows + Alt + R again.
Once you’ve captured everything you need, press the button again to stop the recording. This will save the video file automatically.
Step 5: Locate your recording.
To find your recording, open the “Captures” folder in your “Videos” library.
Windows stores recordings in the Captures folder by default. Access your screen recordings by opening File Explorer and navigating to this folder.
After completing these steps, your screen recording will be saved as a video file on your computer. You can now share it, edit it, or upload it as needed.
How to screen record on Windows 11
Screen recording in Windows 11 is straightforward thanks to built-in features such as the Snipping Tool and Xbox Game Bar, both of which operate seamlessly in Windows 10. However, if you prefer to record online or want more flexibility, programs such as Riverside work the same on both versions.
Let’s go over how to use each one.
How to Screen Record on Windows Using the Snipping Tool
The Snipping Tool has long been a favorite for taking screenshots, but in Windows 11, it received a significant upgrade: it can also record video. This built-in tool is ideal for rapid, no-fuss screen recordings, such as demos, lessons, and troubleshooting.
Here’s how to record your Windows 11 screen with the Snipping Tool:
- In the Start menu, look for the “Snipping Tool” and click to launch it. To access the recording option if you’re running an older version of Windows 11, make sure your app has been updated through the Microsoft Store. To do so, go to the Microsoft Store and search for “Snipping Tool,” then click “Update” if one is available.
- Look for the video camera icon in the Snipping Tool’s top toolbar. Click this icon to enter screen recording mode.
- Click “New” in the top menu bar. Your screen will dim significantly, allowing you to decide the region to record.
- To record a portion of your screen, draw a rectangle around the area you want to capture. This is useful for focusing on a certain window or section of your desktop. If you want to record the entire screen, simply drag the rectangle over it.
- After you’ve chosen your recording area, click “Start.” The Snipping Tool will give you a 3-second countdown before starting the recording, which will capture everything that happens in the targeted region.
- Once you’ve finished your session, click the “Stop recording” button in the toolbar. A preview of your film will appear, allowing you to view the clip.
- Click “Save,” select a file location, and save the recording as an MP4 file.
How to screen record on MacBook
macOS includes a robust screen-capturing feature in the Screenshot program. Here’s how to utilize it:
Step 1: Launch the Screenshot Toolbar. Shortcut: Press Shift + Command + 5 at the same time.
Toolbar Options: A toolbar will appear at the bottom of your screen, offering a variety of screen capture choices.
Step 2: Select Your Recording Option.
You have three main recording options:
Record the entire screen. To begin recording, first click the “Record Entire Screen” icon, then anywhere on the screen.
Record a Selected Portion. Click on the “Record Selected Portion” icon. Adjust the frame to capture only the portion of the screen you require, then click “Record.”
Record Audio (Optional): If you want to include audio in your recording, click “Options” and choose the microphone source. This is ideal for narrating a tutorial or presentation.
Step 3: Start and Stop the Recording
Begin Recording: Once you’ve made your decision, click “Record” to begin.
Stop Recording: To stop the recording, click the stop button in the menu bar at the top of the screen or press Command + Control + Esc.
When you stop recording, the video file will display on your desktop. You can then examine, change, or distribute it as necessary.
Conclusion
How to screen record on Laptop is simple, thanks to built-in tools such as the Snipping Tool and Xbox Game Bar. Each of them has its unique features, making them the best approaches. Once you have discovered which is best for you, focus on experimenting and see what works.
You can download any of these tools with the links below
Good luck.